CUTAQUIG Solution for infusion Ref.[10790] Active ingredients: Human normal immunoglobulin G
Source: FDA, National Drug Code (US) Revision Year: 2020
1. Indications and Usage
CUTAQUIG (Immune Globulin Subcutaneous (Human) - hipp) is a 16.5% immune globulin solution for subcutaneous infusion (IGSC), indicated as replacement therapy for primary humoral immunodeficiency (PI) in adults. This includes, but is not limited to, common variable immunodeficiency (CVID), X-linked agammaglobulinemia, congenital agammaglobulinemia, Wiskott-Aldrich syndrome, and severe combined immunodeficiencies.
2. Dosage and Administration
For subcutaneous use only.
- Before receiving treatment with CUTAQUIG: Obtain the patient's serum Immunoglobulin G (IgG) trough level to guide subsequent dose adjustments (see Dose Adjustment).
2.1 Dose
- Individualize the dose based on the patient's pharmacokinetic and clinical response. Monitor serum IgG trough levels regularly to guide subsequent dose adjustments as needed (see Dose Adjustment).
- Start CUTAQUIG treatment one week after the last IGIV/IGSC infusion.
Dose for patients switching to CUTAQUIG from IGIV:
- Ensure that patients have received Immune Globulin Intravenous (Human) (IGIV) treatment at regular intervals for at least 3 months.
- Establish the initial weekly dose of CUTAQUIG by converting the monthly IGIV dose into an equivalent weekly dose and increasing it using a dose adjustment factor.
- To calculate the initial weekly dose of CUTAQUIG, divide the monthly IGIV dose in grams by the number of weeks between IGIV infusions and then multiply this value with a Dose Adjustment Factor of 1.40.

- To convert the dose (in grams) to milliliters (mL), multiply the calculated dose (in grams) by 6.
- Provided the total weekly dose is maintained, any dosing interval from daily up to weekly can be used and will result in systemic IgG exposure that is comparable to the previous IGIV treatment.
- On average, serum IgG trough levels were approximately 23% higher during CUTAQUIG administration compared to those obtained during prior IGIV therapy.
- To guide dose adjustments, see Table 1 under Dose Adjustment.
Dose for patients switching to CUTAQUIG from IGSC:
- Ensure that patients have received IGSC at regular intervals for at least 3 months before switching to CUTAQUIG.
- It is recommended to maintain the same weekly dosing (in grams) of CUTAQUIG that was used for the previous Immune Globulin Subcutaneous (Human) (IGSC) therapy (in grams).
- To convert the dose (in grams) to milliliters (mL), multiply the calculated dose (in grams) by 6.
- Obtain a trough IgG level before switching, monitor clinical response and check the trough IgG level 2 to 3 months after initiating CUTAQUIG.
- To guide dose adjustments, see Table 1 under Dose Adjustment, if the trough IgG level during CUTAQUIG administration differs from the trough IgG level obtained during treatment with the previously administered IGSC product or target trough level.
Dose Adjustment
Over time the dose may need to be individualized for each patient, dependent on the pharmacokinetic and clinical response and on the desired IgG trough level. Measure the patient's serum IgG trough level 2-3 months after switching to CUTAQUIG or after the last CUTAQUIG dose adjustment, in order to determine if a dose adjustment is necessary.
Calculate the difference between the patient's target serum IgG trough level (in mg/dL) and the IgG trough level obtained during subcutaneous treatment with CUTAQUIG. Find this difference in column 1 of Table 1 and locate the corresponding adjustment amount of CUTAQUIG in mL/administration according to the body weight of the patient.
Use the patient's clinical response as primary point to consider for any dose adjustment. Additional dose increments may be indicated based on the patient's clinical response (i.e., infection frequency and severity).
Table 1. Incremental adjustment (mL) of weekly CUTAQUIG dosing based on the calculated difference between actual IgG trough level and the target trough level for the patient*:
| Difference from Target Serum IgG Trough Level | Weight-adjusted Dose Increment (mL*) | ||||
|---|---|---|---|---|---|
| Body Weight | |||||
| 30 kg | 50 kg | 70 kg | 90 kg | 110 kg | |
| 50 mg/dl | 3 | 4 | 6 | 8 | 10 |
| 100 mg/dl | 5 | 9 | 12 | 16 | 19 |
| 200 mg/dl | 11 | 18 | 25 | 32 | 39 |
| 300 mg/dl | 16 | 26 | 37 | 47 | 58 |
* Derived from a linear regression model of trough levels and weekly dose per kg body weight.
For example: a patient with body weight of 70 kg is treated weekly and has a trough level of 600 mg/dL, but the target trough level is 900 mg/dL The difference between the actual trough level (600) and the desired trough level (900) is plus 300 mg/dL. Therefore, the recommended increase in the weekly dose would be 37 mL.
Monitor the patient's clinical response and periodically check trough IgG levels, and repeat dose adjustment as needed.
Measles Exposure
If a patient has been exposed to measles, it may be prudent to administer a dose of Immune Globulin Intravenous as soon as possible and within 6 days of exposure. A dose of 400 mg/kg should provide a serum level >240 mIU/mL of measles antibodies for at least two weeks.
If a patient is at risk of future measles exposure and receives a dose of less than 245 mg/kg subcutaneously per week, the dose should be increased to 245 mg/kg.
2.2 Preparation
CUTAQUIG is a clear and colorless solution that may turn to slightly opalescent and pale yellow during storage. Do not use the solution if it appears cloudy or contains particulates.
- Use aseptic technique when preparing and administering CUTAQUIG.
- Prior to administration visually inspect each vial of CUTAQUIG for particulate matter, whenever the solution and container permit.
- Do not mix CUTAQUIG with other products.
- Do not dilute CUTAQUIG.
- Do not shake the solution.
- Check the labeling for the expiration date and do not use beyond this date.
- CUTAQUIG vials are for single use only. Discard any unused product after each infusion in accordance with local requirements.
- Do not freeze. Do not use frozen product.
- Record lot number in patient's medical history.
2.3 Administration
CUTAQUIG is for subcutaneous use only.
Administer CUTAQUIG weekly by a healthcare provider, or by caregiver or self-administered by the patient after appropriate training.
CUTAQUIG may be infused in the following areas: abdomen, thigh, upper arm, and/or upper leg/hip area.
CUTAQUIG is intended for subcutaneous use using an infusion pump and compatible syringe(s).
CUTAQUIG may be infused simultaneously into up to 6 different sites. Infusion sites should be at least 2 inches (5 cm) apart. Rotate infusion sites between subsequent administrations.
Volume:
For patients not already on Immune Globulin Subcutaneous (Human) (IGSC) therapy, the maximum initial volume per injection site should not exceed 25 mL. From the 6th infusion onwards the volume may be gradually increased to a maximum of 40 mL/site as tolerated.
Rate:
Maximum recommended flow rates per hour per infusion site are as follows:
First 6 infusions: 15-20 mL per hour per site.
Subsequent infusions: 25 mL per hour per site as tolerated.
Maximum recommended flow rates per hour for all sites combined:
First 6 infusions: 30 mL per hour for all sites combined.
From infusion number 7 onwards a gradual increase to 50 mL per hour for all sites combined, subsequently to 80 mL per hour for all sites combined, and if tolerated a further gradual increase to up to 100 mL per hour for all sites combined may be possible.
Table 2. Infusion Volumes and Infusion Rates:
| Infusion parameters* | Infusion Number | |
|---|---|---|
| 1st-6th | 7th and above | |
| Volume (mL/site) | ≤25 | gradually increase to max of 40 |
| Rate (mL/hr/site) | ≤20 | 25 |
| Rate (mL/hr/all sites combined) | 30 | Gradually increase to 50 mL, then to 80 mL; if well tolerated, use a max of 100 mL |
* As tolerated
Administration/Handling instructions
CUTAQUIG is for subcutaneous use only.
Follow the administration guidance below and use aseptic technique when administrating CUTAQUIG.
1. Getting ready for infusion:
- Choose and prepare a clean work area.
- Gather your infusion equipment:
- Infusion pump and compatible syringe(s).
- Needle or needleless transfer device (for drawing up product from the vial).
- Infusion set (varies according to manufacturer's instructions).
- Infusion tubing and Y-connector (if required).
- Ancillary supplies: disinfectant wipes, gauze or transparent dressing, tape and sharps container.
- Patient's treatment diary/log book.
- Wash your hands thoroughly and let them dry (Figure 1).
Figure 1:

2. Checking and opening the vials:
- If taken out of the refrigerator, allow products to reach room temperature (≤ 25°C/77°F).
- Inspect each vial carefully:
- Check that labelled dose is correct and based on prescription.
- Check that the expiration date has not been passed.
- Check the appearance of the solution: do not use the solution if it is cloudy or contains particles.
- Make sure the protective cap is not broken or missing.
- Remove the protective cap.
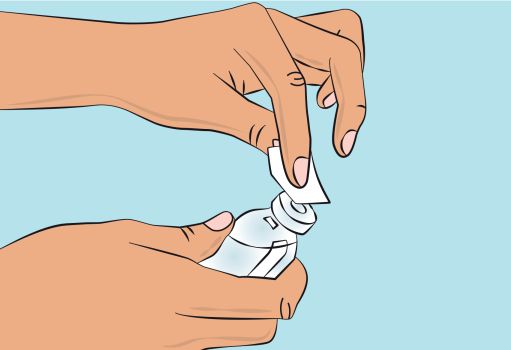
- Disinfect the rubber stopper by using a sterile wipe and allow it to dry (Figure 2).
Figure 2:
3. Preparing and filling the syringe:
- Open sterile syringe and needle or needleless transfer device.
- If a needleless transfer device is used, follow the instructions of the device manufacturer.
- If the transfer is done using needle and syringe follow the instructions below:
- Attach the needle to the syringe with a screw action.
- Draw back on the plunger to fill the syringe with air which should be roughly equal to the amount of solution needed from the vial.
- Insert the needle into the center of the vial stopper and turn the vial upside down. To avoid foaming, ensure that the tip of the needle is not in the solution, and then inject the air.
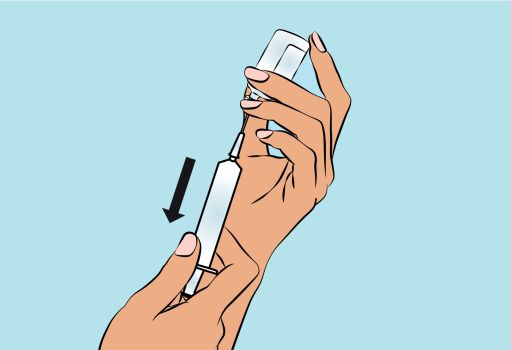
- Next, move the needle so that the tip is in the solution, and then slowly draw up the desired volume of CUTAQUIG (Figure 3).
- Withdraw the needle from the vial.
- This procedure might be repeated if you need to use more than one vial.
- When finished, remove the needle and dispose of it into the sharps bin and proceed to the next step.
Figure 3:
4. Preparing the infusion pump and tubing:
- Follow the manufacturer's instructions for preparing the infusion pump.
- Prime the administration tubing according to manufacturer's instruction to eliminate all remaining air (Figure 4).
Figure 4:

5. Preparing the infusion site(s) and inserting the infusion needle(s):
- CUTAQUIG can be infused in the following areas: abdomen, thigh, upper arm, and/or upper leg/hip area (Figure 5).
- The number and location of injection sites depends on the volume of the total dose. The infusion sites should be at least 2 inches apart. A maximum of 6 infusion sites can be used simultaneously.
- Rotate sites between infusions.
- Avoid inserting the needle into scars, tattoos or injured/inflamed skin areas and inspect skin for signs of infection.
- Clean your skin at your selected infusion site(s) with an antiseptic skin wipe starting at the center and working outward in a circular motion, and allow each site to dry before proceeding.
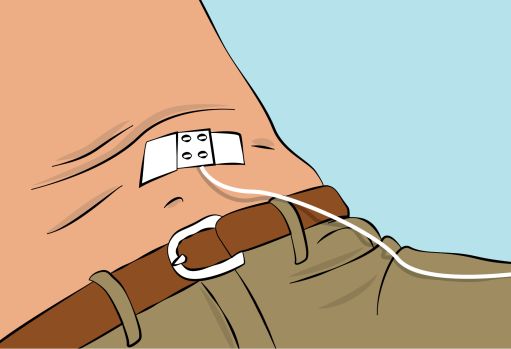
- Pinch the skin between your thumb and forefinger around the injection site (Figure 6) and insert the needle into the subcutaneous tissue (Figure 7). The angle of the needle will depend on the type of infusion set being used.
- Secure the needle in place by applying sterile gauze and tape or transparent dressing (Figure 8).
Figure 5:
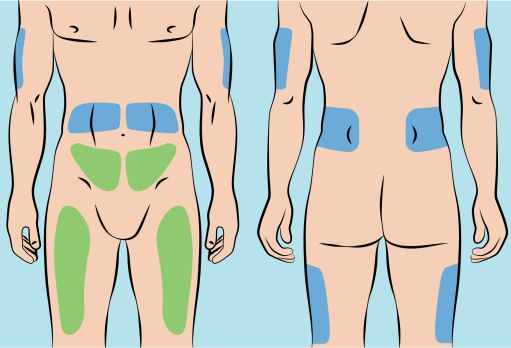
Figure 6:
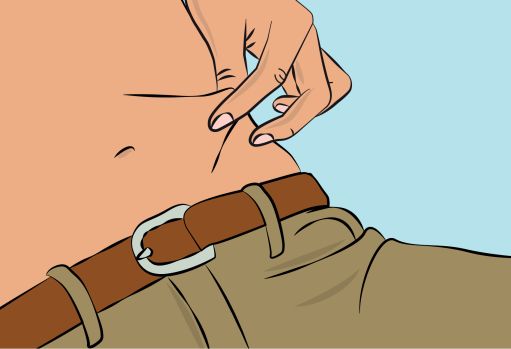
Figure 7:
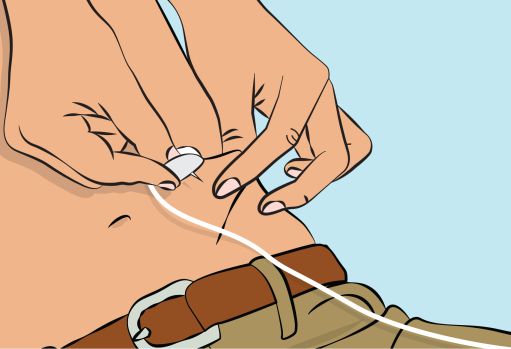
Figure 8:
6. Checking the infusion:
- Check needle placement by pulling back on the syringe plunger. There should not be any blood return in the tubing.
- If blood return is seen, remove needle and restart from step 5 with new tubing at a different location.
7. Starting the infusion:
- Start the infusion. Follow infusion pump manufacturer's instructions.
8. Recording the infusion:
- On each vial of CUTAQUIG, you will find a peel-off portion of the label with the batch number details. Stick this label in your patient's treatment diary or infusion log book. Record details of the dose, date, time, infusion site location and any infections, side effects or other comments.
9. After infusion is complete:
- Gently remove the needle(s) and immediately place into the sharps bin.
- If necessary press a small piece of gauze on the needle site and apply a dressing.
- Discard all used disposable supplies as well as any unused product and the empty vial(s) as recommended by your healthcare provider and according to local requirements.
- Clean and store the infusion pump according to the manufacturer's instructions.
For self-administration, provide the patient and caregiver with instructions and appropriate training for infusion at home or other appropriate setting. Verify that the patient or caregiver is capable of self-administration using appropriate technique.
16.2. Storage and Handling
- Components used in the packaging of CUTAQUIG are not made with natural rubber latex.
- Store at +2°C to +8°C (36°F to 46°F) for up to 36 months from the date of manufacture. Within its shelf-life, the product may be stored at room temperature up to +25°C (77°F) for up to 6 months without being refrigerated again during this period, and must be discarded if not used after this.
- Keep the vial in the outer carton to protect it from light.
- Check the product expiration date on the vial label. Do not use beyond the expiration date.
- Do not freeze. Do not use frozen product.
- Do not mix with other products.
- Do not shake the vial.
- Use aseptic technique when preparing and administering CUTAQUIG. Prior to administration, visually inspect each vial for particulate matter, whenever the solution and container permit. Do not use if the solution is cloudy or contains particulates.
- The vial is for single-use only. Discard any unused product after each infusion, in accordance with local requirements.
© All content on this website, including data entry, data processing, decision support tools, "RxReasoner" logo and graphics, is the intellectual property of RxReasoner and is protected by copyright laws. Unauthorized reproduction or distribution of any part of this content without explicit written permission from RxReasoner is strictly prohibited. Any third-party content used on this site is acknowledged and utilized under fair use principles.