LEVOSERT Intrauterine delivery system (IUS) Ref.[27903] Active ingredients: Levonorgestrel
Source: Medicines & Healthcare Products Regulatory Agency (GB) Revision Year: 2020 Publisher: Gedeon Richter Plc., Gyömrői út 19-21., 1103 Budapest, Hungary
4.1. Therapeutic indications
Contraception.
Treatment of heavy menstrual bleeding. Levosert may be particularly useful in women with heavy menstrual bleeding requiring (reversible) contraception.
4.2. Posology and method of administration
Starting treatment
In women of fertile age, Levosert is inserted into the uterine cavity within seven days of the onset of menstruation. It can be replaced by a new system at any time of the cycle.
Post-partum insertion: To reduce the risk of perforation, postpartum insertions should be postponed until the uterus is fully involuted. Do not insert earlier than six weeks after delivery. If the patient is experiencing significant post-partum bleeding and/or pain then infection or other causes should be excluded before insertion. Levosert can also be inserted immediately after the first trimester abortion.
Levosert is effective for six years in the indication for contraception and five years in the indication for heavy menstrual bleeding. Therefore, it should be removed after 5 or 6 years of use, according to the indication.
If the user wishes to continue using the same method, a new system can be inserted at the same time, in which case no additional protection is required.
Paediatric population
Levosert has not been studied in patients below 16 years of age. Levosert should not be used before menarche.
Hepatic impairment
Levosert is contraindicated in patients with liver tumour or other acute or severe liver disease (see section 4.3).
Instructions for use and handling
Levosert is supplied in a sterile pack which should not be opened until required for insertion. The exposed product should be handled with aseptic precautions. If the seal of the sterile package is broken, the product should be discarded (see section 6.6 for disposal instructions).
How to insert Levosert
It is strongly recommended that Levosert should only be inserted by physicians/health care professionals who are experienced in levonorgestrel IUS insertions and/or have undergone sufficient training for levonorgestrel IUS insertion.
In case of difficult insertion and/or exceptional pain or bleeding during or after insertion, please refer to section 4.4.
- Levosert is supplied sterile having been sterilised with ethylene oxide. Do not resterilise. For single use only. Do not use if the inner package is damaged or open. Do not apply after the last day of the month shown on the label.
- Levosert is inserted with the provided inserter into the uterine cavity by carefully following the insertion instructions.
The following insertion instruction will be provided in the box containing the IUS.
Please read the following instructions for use carefully as there may be some difference in the type of inserter device compared with other intrauterine (IUDs) you have used previously.
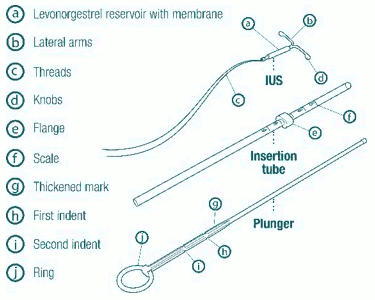
Description
Conditions for use
- In women of fertile age, Levosert is inserted within seven days of the onset of menstruation. It can be replaced by a new system at any time of the cycle.
- It is strongly recommended that Levosert should only be inserted by physicians/health care professionals who have undergone sufficient training and have read carefully these instructions before Levosert insertion.
- Levosert is supplied in a sterile pack which should not be opened until required for insertion. The exposed product should be handled with aseptic precautions. Do not use if the inner package is damaged or open.
- Determine the position (anteversion, retroversion) and size of the uterus by a gynaecological examination. Exclude pregnancy and contraindications.
- Place a speculum, use appropriate antiseptic solution to clean the vagina and cervix.
- Use cervical dilators if cervical stenosis is diagnosed. Do not force to overcome resistance.
- Grasp the cervix with a Tenaculum forceps and apply a gentle traction in order to straighten alignment of the cervical canal and uterine cavity.
- Determine the uterine depth by hysterometry. If uterine depth is <5.5 cm discontinue the procedure.
Preparation for insertion
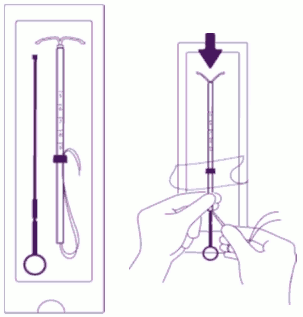 | Introduce the plunger and the IUS in the insertion tube: Partly open the blister (about 1/3 from the bottom) and introduce the plunger in the insertion tube. Extricate the threads from the flange. Pull the thread to introduce the IUS into the tube. The arms of the IUS must stay in a horizontal plan, parallel to the flat side of the flange. |
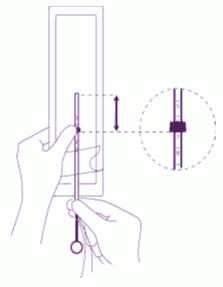 | Position the lower edge of the flange at the sounded value: Position the blue flange so as the lower edge of the flange indicates the value found by hysterometry. The flat sides of the flange must always remain parallel to the arms. This will allow the arms to open correctly in the uterine cavity. |
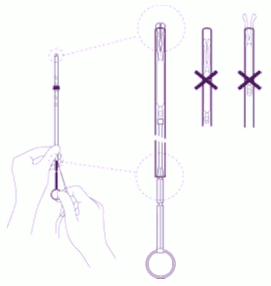 | Adjust the position of the IUS in the insertion tube: Hold the plunger firmly while pulling the thread and moving the tube to adjust the position of the IUS. The knobs of the lateral arms must be closely opposed to each other, slightly above the upper extremity of the insertion tube (see zoom 1) and the distal edge of the tube must be aligned with the first indent of the plunger (see zoom 2). If the tube is not aligned with the first indent of the plunger you must pull the thread more firmly. |
Insertion
 | Introduce the device in the cervical canal until the blue flange is in contact with the cervix: Take the whole device out of the blister, by holding firmly the plunger and tube together in the correctly adjusted position. Introduce the assembly into the cervical canal until the blue flange is in contact with the cervix. |
 | Release the arms of the intrauterine device: Hold the plunger, release the thread and pull the insertion tube down until its lower extremity reaches the second indent of the plunger. |
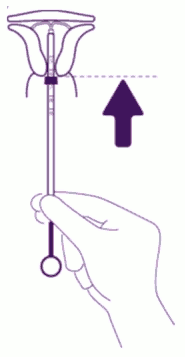 | Push the IUS against the fundus: To position the IUS in the uterine cavity, push the insertion tube simultaneously with the plunger, until the blue flange is again in contact with the cervix. Levosert is then correctly placed in the uterine cavity. |
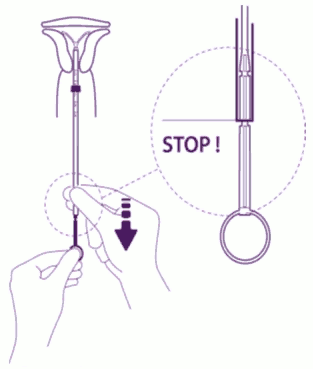
 | Release the IUS from the tube into the uterine cavity: Without moving the plunger, pull the insertion tube down to the ring of the plunger. A slight resistance marks the passage of the bulge of the plunger. Nevertheless, pull down the tube to the ring of the plunger. Levosert is then released completely from the insertion tube. |
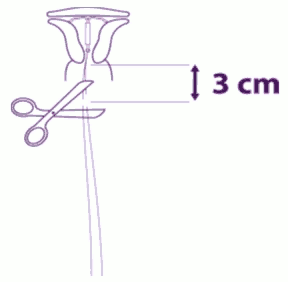 | Remove sequentially the inserter components and cut the threads: Remove sequentially, first the plunger, then the insertion tube. Cut the threads at around 3 cm from the cervix. |
IMPORTANT!
In case of difficult insertion and/or exceptional pain or bleeding during or after insertion, physical examination and ultrasound should be performed immediately to exclude perforation of the uterine body or cervix. If necessary, remove the system and insert a new, sterile system.
Please report any case of uterine perforation or insertion difficulties via the MHRA Yellow Card Scheme (www.mhra.gov.uk/yellowcard) or search for MHRA Yellow Card in the Google Play or Apple App Store.
How to remove Levosert
Levosert is removed by gently pulling on the threads with forceps. If the threads are not visible and the device is in the uterine cavity, it may be removed using a narrow tenaculum or intrauterine thread retriever. This may require dilatation of the cervical canal.
If pregnancy is not desired, the removal should be carried out during the menstruation in women of fertile age, provided that there appears to be a menstrual cycle. If the system is removed in the mid-cycle and the woman has had intercourse within a week, she is at a risk of pregnancy unless a new system is inserted immediately following removal.
After removal of Levosert, the device should be checked to ensure it is intact. During difficult removals, single cases have been reported of the hormone cylinder sliding over the horizontal arms and hiding them together inside the cylinder. This situation does not require further intervention once completeness of the IUS has been ascertained. The knobs of the horizontal arms usually prevent complete detachment of the cylinder from the T-body.
4.9. Overdose
Not applicable.
6.3. Shelf life
5 years.
6.4. Special precautions for storage
Store in the original package. Keep the pouch in the outer carton in order to protect from light.
6.5. Nature and contents of container
Levosert IUS with the inserter device is individually packed into a thermoformed blister (polyester) package with a peelable lid (TYVEK-Polyethylene).
6.6. Special precautions for disposal and other handling
As the insertion technique is different from intrauterine devices, special emphasis should be given to training in the correct insertion technique. Special instructions for insertion are in the package.
Levosert is supplied in a sterile pack which should not be opened until required for insertion. Each system should be handled with aseptic precautions. If the seal of the sterile envelope is broken, the system inside should be disposed of in accordance with the local guidelines for the handling of biohazardous waste. Likewise, a removed Levosert and inserter should be disposed of in this manner. The outer carton package and the inner blister package can be handled as household waste.
© All content on this website, including data entry, data processing, decision support tools, "RxReasoner" logo and graphics, is the intellectual property of RxReasoner and is protected by copyright laws. Unauthorized reproduction or distribution of any part of this content without explicit written permission from RxReasoner is strictly prohibited. Any third-party content used on this site is acknowledged and utilized under fair use principles.