OTARMENI Solution for injection Ref.[116655] Active ingredients: Lunsotogene parvec
Source: FDA, National Drug Code (US) Revision Year: 2026
1. Indications and Usage
OTARMENI is indicated for the treatment of pediatric and adult patients with severe-to-profound and profound sensorineural hearing loss (any frequency >90 dB HL) associated with molecularly confirmed biallelic variants in the OTOF gene, preserved outer hair cell function, and no prior cochlear implant in the same ear.
This indication is approved under accelerated approval based on the improvement of hearing sensitivity assessed by average pure tone audiometry (PTA) at Week 24 [see Clinical Studies (14)]. Continued approval for this indication may be contingent upon verification and description of clinical benefit in the confirmatory clinical trial.
Limitations of Use
OTARMENI is not recommended in patients in whom preoperative imaging demonstrates that access to the inner ear is not feasible including those with abnormal mastoid pneumatization or clinically significant anatomic variations of the middle ear and inner ear.
2. Dosage and Administration
2.1 Critical Dosing and Administration Information
- Confirm patient has biallelic, likely pathogenic or pathogenic OTOF variants.
- OTARMENI should be administered by a surgeon experienced in intracochlear surgery and trained in the administration procedure.
- Administer bilateral OTARMENI, if applicable, in a single surgical session.
- For prophylaxis against inflammatory and immunological responses, administer systemic oral corticosteroids equivalent in strength to prednisone at 1 mg/kg/day the day of the OTARMENI infusion, maintain the same dose for two weeks, and taper over the following two weeks. The total corticosteroid dose should not exceed 60 mg/day.
- For prophylaxis against post-operative infection, administer antibiotics before incision.
- Administer age-appropriate vaccination prior to treatment with OTARMENI. Administer vaccines at least 1 month before the first corticosteroid dose and at least 1 month after the last dose.
- Vaccinate patients against micro-organisms that cause meningitis before surgery as meningitis is a known risk of inner ear surgery.
2.2 Recommended Dosage
For intracochlear infusion only.
The recommended dose of OTARMENI for each ear is 7.2 × 10¹² vector genomes (vg) in a total volume of 0.24 mL, administered by a single-dose intracochlear infusion.
2.3 Preparation
Prepare syringe containing OTARMENI using sterile technique under aseptic conditions in a Class II biological safety cabinet (BSC). Administer OTARMENI within 4 hours of puncturing the vial. Below is the list of items required for administration syringe preparation. Confirm component packaging and inspect each item prior to use and do not use if any damage is identified.
- One single-dose vial of OTARMENI in a sealed barrier bag (package 1 of 2) [see How Supplied/Storage and Handling (16)]
- Administration Kit for use with OTARMENI (package 2 of 2) [see How Supplied/Storage and Handling (16)]
- Not supplied but required:
- One isopropyl alcohol pad
- One sterile sealable plastic bag
- Secondary container for delivery to surgical suite
- Label and a pen
Preparation of OTARMENI for Infusion:
- For each treated ear, thaw one single-dose vial of OTARMENI at room temperature. The contents of the vial will thaw in approximately 30 minutes at room temperature. DO NOT thaw or warm the vial any other way.
- Gently invert the vial 5 times (DO NOT shake or vortex the vial).
- Inspect the OTARMENI vial to ensure that it is thawed, clear to slightly opalescent, and that the vial has no signs of damage. If there is any evidence of cloudiness, particulates, or color, do not use the vial.
- If not used immediately, store the unpunctured thawed vial in the refrigerator for up to 24 hours or at room temperature for up to 8 hours.
- Choose the smallest compatible syringe size, either 1 mL or 3 mL included in the kit, according to the syringe pump parameters. Discard the unused syringe. Do not open the catheter sterile packaging until transferred to the surgical suite.
- Prepare the septum of the OTARMENI vial using an isopropyl alcohol pad to wipe the top. Wait for the septum to dry. Secure the 21G, 1.5-inch needle onto the 1 mL or 3 mL syringe. When filling the syringe for administration, push the needle until it is completely inserted into the vial and the tip touches the bottom edge of the upright vial. Administer OTARMENI within 4 hours of puncturing the vial.
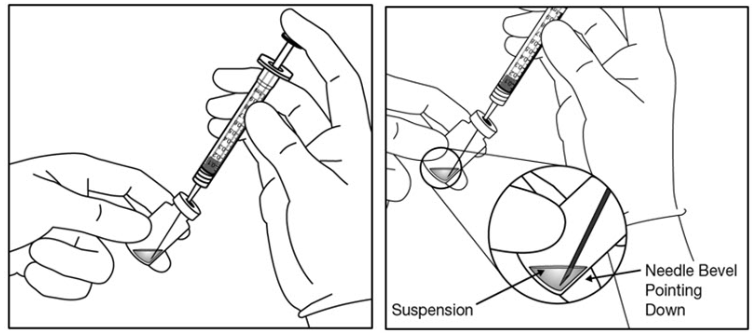
- Withdraw all OTARMENI vial contents into the syringe. Tilt the vial to ensure complete withdrawal. Confirm that at least 0.6 mL is available in the syringe. To prevent the introduction of air, keep the needle bevel submerged in the liquid at the bottom edge of the vial by orienting the bevel towards the vial wall (Figure 1).
Figure 1:
- Holding the syringe with the needle pointing up, check the syringe for bubbles. If there are bubbles, gently tap the syringe with your finger until the bubbles rise to the top.
- Remove the needle and prime the air bubbles out of the syringe by depressing the plunger rod until the air is fully expelled and the meniscus is visible at the syringe opening.
- Cap and label the syringe with the following:
- Lot number of OTARMENI
- Expiration date of OTARMENI
- Time of preparation to ensure that product is administered within 4 hours after puncturing the vial
- Place the capped syringe into the sterile plastic bag and seal the bag. Place the bag into an appropriate secondary container for delivery to the surgical suite.
2.4 Administration
Administer OTARMENI in the surgical suite under general anesthesia with controlled aseptic conditions by a surgeon experienced in intracochlear surgery and trained in the OTARMENI administration procedure.
Administer OTARMENI within 4 hours of puncturing the vial.
The following items are required for administration:
- Syringe containing OTARMENI
- Catheter supplied with Administration Kit for use with OTARMENI (package 2 of 2) [see How Supplied/Storage and Handling (16)]
- Not supplied but required:
- Syringe pump, capable of delivering a volume of 0.24 mL at an infusion rate of 0.9 mL/hr and is compatible with the provided 1 mL or 3 mL syringe sizes
- Electrode insertion forceps
- Fine straight pick
- Mayo stand
Note: Only administer OTARMENI using the provided Administration Kit for use with OTARMENI.
Confirm the availability of OTARMENI (1 vial and 1 Administration Kit per treated ear) prior to administration of anesthesia.
Inspect each item prior to use and do not use if any damage is identified. Do not use if the sterile bag was damaged during transport or if the syringe was transported without the use of a sterile bag.
Follow the steps below for intracochlear infusion:
- Perform a standard mastoidectomy and an opening of the facial recess (also called a posterior tympanotomy). Consider monitoring the facial nerve using intraoperative facial nerve-monitoring (IFNM) throughout the procedure.
- With the help of an assistant, place the syringe pump on a sterile draped Mayo stand (positioned higher than the patient's cochlea) and ensure there is enough distance to allow the catheter to reach the round window membrane.
- Have the non-sterile assistant remove the cap from the syringe and help attach the provided catheter (the stylet will need to be removed from the catheter). Do not flush the catheter.
- Slowly prime the catheter manually with minimal loss by removing all air bubbles until OTARMENI is just visible at the tip of the catheter. The anticipated priming volume is approximately 0.11 mL.
- Have the non-sterile assistant hold the syringe and confirm that at least 0.4 mL of OTARMENI is available in the syringe after priming. Instruct the assistant to place the syringe onto the syringe pump while you maintain control of the catheter in the sterile field.
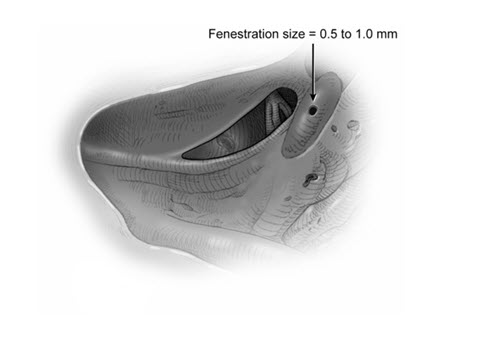
- Perform a 0.5 to 1 mm fenestration of the lateral semi-circular canal (Figure 2). Do not apply suction near the fenestration of the lateral semi-circular canal.
Figure 2. Lateral Semi-Circular Canal Fenestration:
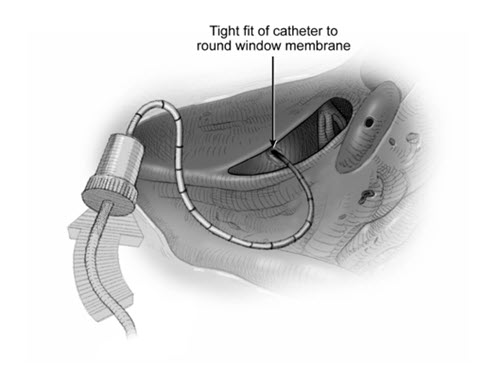
- Perforate the round window membrane using a fine straight pick or equivalent in the anterior-inferior aspect to create an opening that is sufficiently smaller than the size of the catheter to ensure a water-tight seal and prevent fluid backflow at the round window membrane (Figure 3). Do not apply suction near the round window opening. The diameter of the catheter is 1 Fr, 28 G, or 0.33 mm.
Figure 3. Round Window Perforation:
- Have the assistant program the syringe pump by selecting the brand, model, and size of the provided syringe to deliver fluid at 0.9 mL/hr with a total volume of 0.24 mL. To confirm the catheter's priming, have the assistant initiate the pump while the catheter tip is inspected. Once the presence of OTARMENI is noted at the tip of the catheter, stop the pump, and set the volume counter/limiter to zero. Instruct the assistant to note the initial volume in the syringe and verify that at least 0.3 mL of OTARMENI is available.
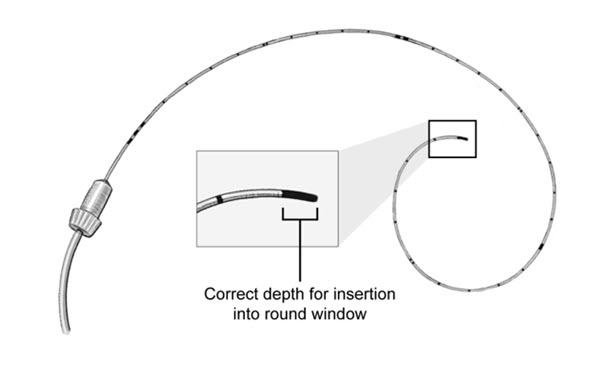
- Place the catheter tip through the round window membrane using electrode insertion forceps. Insert the catheter until the edge of the first black marker is just visible at the round window (approximately 4 mm), but no further (Figure 4). Do not over-insert the catheter. Allow the catheter to rest passively while minimizing all catheter movement during infusion. During this insertion process, some perilymph might extrude from the newly created fenestration of the lateral semicircular canal.
Figure 4. Catheter Insertion:
- If the catheter cannot be easily inserted through the round window membrane perforation, enlarge the perforation using a fine straight pick or equivalent.
- After confirming the pump parameters (0.24 mL at 0.9 mL/hr), instruct the assistant to initiate the pump and monitor the progression of the syringe plunger and volume counter during the entire infusion.
- Monitor the infusion continuously to ensure there are no interruptions, including pump alarms/alerts, flow interruption, system malfunction, or power failure. The pump should run continuously for 16 minutes. Monitor the round window membrane continuously for evidence of backflow and the fenestration in the lateral semicircular canal for evidence of forward flow.
** Pause immediately and determine the time of interruption and volume delivered using the syringe markings and volume counter. Maintain catheter position.
** Inspect all infusion components to determine the source of the interruption.
*** If a complete infusion of 0.24 mL has been delivered, then proceed to Step 13.
*** If 0.24 mL has not been delivered, determine if the infusion can be resumed depending on the length and cause of the interruption, if medically appropriate.
*** If the interruption cannot be resolved, abort the procedure. Proceed to Steps 14 – 17.
* After the completion of the infusion (16 minutes), leave the catheter in place for an additional 5-minute hold. Before removing the catheter, instruct the assistant to verify complete dose delivery by reading the final volume on the syringe, which should read approximately 0.24 mL less than the initial reading noted immediately before infusion.
* After the 5-minute hold is completed, remove the catheter from the round window membrane using the electrode insertion forceps. Do not flush the catheter.
* Close the round window membrane and the lateral semi-circular canal with a fascia overlay. Additionally, a bone cap can be used to reinforce the canal fenestration, while avoiding plugging the canal.
* Close the postauricular wound in a typical fashion.
* Following infusion, discard any remaining OTARMENI and disposable material according to local biosafety guidelines.
16.2. Storage and Handling
OTARMENI suspension (2 mL vial):
Store and transport OTARMENI (package 1) frozen at -80°C (-112°F). Keep the vial in the supplied carton. Thaw OTARMENI at room temperature prior to administration. If not used immediately, the unpunctured thawed vial can be stored in the refrigerator (2°C to 8°C [36°F to 46°F]) for up to 24 hours or at room temperature (up to 25°C [77°F]) for up to 8 hours [see Dosage and Administration (2.3)]. Do not refreeze vial once thawed.
Administration Kit for use with OTARMENI:
Store at room temperature in original carton separately from OTARMENI until time of use. Do not freeze. Avoid excessive heat and direct sunlight.
© All content on this website, including data entry, data processing, decision support tools, "RxReasoner" logo and graphics, is the intellectual property of RxReasoner and is protected by copyright laws. Unauthorized reproduction or distribution of any part of this content without explicit written permission from RxReasoner is strictly prohibited. Any third-party content used on this site is acknowledged and utilized under fair use principles.