SIXMO Implant Ref.[28026] Active ingredients: Buprenorphine
Source: European Medicines Agency (EU) Revision Year: 2020 Publisher: L. Molteni & C. dei F.lli Alitti Soc.Es.S.p.A, Strada Statale 67, 50018 Scandicci (Firenze), Italy
4.1. Therapeutic indications
Sixmo is indicated for substitution treatment for opioid dependence in clinically stable adult patients who require no more than 8 mg/day of sublingual buprenorphine, within a framework of medical, social and psychological treatment.
4.2. Posology and method of administration
Treatment must be under the supervision of a healthcare professional experienced in the management of opioid dependence/addiction. Insertion and removal of the Sixmo implants must be performed by a physician who is competent in minor surgery and has been trained to conduct the insertion and removal procedure. Appropriate precautions, such as the conduct of patient follow-up visits according to the patient's needs and the treating physician's clinical judgement, should be taken during Sixmo treatment.
Patients previously treated with sublingual buprenorphine or sublingual buprenorphine + naloxone, must be on stable doses between 2 to 8 mg/day for at least 30 days and deemed clinically stable by the treating healthcare professional.
The following factors should be considered when determining clinical stability and suitability for Sixmo treatment:
- period free from opioid drug abuse
- stability of living environment
- participation in a structured activity/job
- consistency in participation in recommended behavioural therapy/peer support programme
- consistency in compliance with clinic visit requirements
- minimal to no desire or need to abuse opioids
- period without episodes of hospitalisations (addiction or mental health issues), emergency room visits, or crisis interventions
- social support system
Posology
Sixmo should be used only in patients who are opioid tolerant. Each dose consists of four implants, for subcutaneous insertion in the inner side of the upper arm. Sixmo implants are intended to be in place for 6 months of treatment and provide a sustained delivery of buprenorphine. They are removed by the end of the sixth month.
Treatment with Sixmo
Sublingual buprenorphine should be discontinued 12 to 24 hours prior to subcutaneous insertion of Sixmo implants.
Criteria for the use of supplemental sublingual buprenorphine
It is possible that a subset of patients may require occasional supplemental sublingual buprenorphine support to achieve full control of opioid withdrawal symptoms and cravings, e.g. at times of personal stress or crisis.
The administration of additional buprenorphine sublingual doses should be considered by the treating physician if:
- the patient experiences withdrawal symptoms, e.g. sweating, lacrimation, yawning, nausea, vomiting, tachycardia, hypertension, piloerection, dilated pupils;
- in case of patient's self-reported heroin use, other opioid use or craving and/ or urine samples positive for opioids
Although some patients may require occasional supplemental dosing with buprenorphine, patients should not be provided with prescriptions for sublingual buprenorphine-containing products for asneeded use. Instead, patients who feel the need for supplemental dosing should be seen and evaluated promptly.
Treatment discontinuation criteria
The treating physician should consider implant removal if:
- the patient experiences severe or intolerable side effects (including severe precipitated withdrawal);
- signs of intoxication or overdose appear (miosis, lip cyanosis, sedation, bradycardia, hypotension, respiratory depression);
- the patient experiences lack of efficacy, as evidenced by lasting withdrawal symptoms that require repeated management with sublingual buprenorphine
Discontinuation
Patients who discontinue treatment with Sixmo should be switched back to their previous dose of sublingual buprenorphine within 12 to 24 hours following removal of the Sixmo implants (i.e. the dose from which they were transferred prior to starting Sixmo treatment). The dissociation of buprenorphine from the µ-opioid receptors is expected to take up to several days after discontinuation of Sixmo treatment, which will prevent withdrawal symptoms immediately after removal of Sixmo.
Retreatment
If continued treatment is desired at the end of the first six-month treatment cycle, a new set of 4 Sixmo implants may be administered following removal of the old implants for one additional treatment cycle of six months. The experience of a second treatment cycle is limited. There is no experience of reimplantation beyond 12 months. Implants should be inserted in the inner side of the opposite upper arm, following the insertion steps below to locate the appropriate insertion site.
Implants for repeat treatment should be inserted subcutaneously as soon as possible after removal of the previous implants, preferably on the same day. If implants for repeat treatment are not inserted on the same day as removal of previous implants, individuals should be maintained on a fixed dose of 2 to 8 mg/day of sublingual buprenorphine, as clinically indicated, until repeat treatment occurs. Sublingual buprenorphine should be discontinued 12 to 24 hours prior to insertion of four Sixmo implants.
After one subcutaneous insertion in each arm (for a total of two treatments cycles), most patients should be transitioned back to their previous sublingual buprenorphine dose (i.e. the dose from which they were transferred to Sixmo treatment) for continued treatment. There are no prospective data with Sixmo beyond two treatment cycles, and there is no experience with inserting Sixmo implants into other sites of the arm, sites other than the upper arm or re-insertion into previously-used sites.
Special populations
Elderly
Clinical studies of Sixmo did not include patients over 65 years and, therefore, the use of the product in this population is not recommended. The efficacy and safety of buprenorphine in elderly patients >65 years has not been established. No recommendation on posology can be made.
Hepatic impairment
Because buprenorphine levels cannot be adjusted during Sixmo treatment, Sixmo is contraindicated in patients with severe hepatic impairment (Child-Pugh C) (sections 4.3, 4.4 and 5.2). Patients with mild to moderate hepatic impairment (Child-Pugh A and B) should be monitored for signs and symptoms of toxicity or overdose caused by increased levels of buprenorphine (miosis, lip cyanosis, sedation, bradycardia, hypotension, respiratory depression). In case toxicity or overdose symptoms are observed, the removal of the implants and transition to a medicinal product that allows dose adjustment are required.
Patients who develop hepatic impairment while being treated with Sixmo should be monitored for signs and symptoms of toxicity or overdose. In case toxicity or overdose symptoms develop, the removal of the implants and transition to a medicinal product that allows dose adjustment are required.
Renal impairment
Renal elimination plays a relatively small role (approximately 30%) in the overall clearance of buprenorphine and buprenorphine plasma concentrations were not increased in patients with renal impairment.
Modification of the Sixmo dose is not required in patients with renal impairment. Caution is recommended when dosing patients with severe renal impairment (creatinine clearance <30 mL/min) (see sections 4.4 and 5.2).
Paediatric population
The safety and efficacy of Sixmo in children under 18 years have not yet been established. No data are available.
Method of administration
Subcutaneous use
Preparations for handling or administering the medicinal product
- The insertion and removal of Sixmo should take place under aseptic conditions.
- The patient should be able to lie on their back.
- It is recommended that the healthcare professional is in a seated position during the entire insertion procedure so that the insertion site and the movement of the needle under the skin can be clearly seen from the side. Only a healthcare professional who is competent in minor surgery and is trained in the insertion of Sixmo should perform the procedure, using only the implant applicator, with the recommended local anaesthetic available.
- One applicator is used to insert all four implants.
- Please note that an ultrasound and MRI facilities need to be available to the clinical site at which the insertion and removal of Sixmo occurs.
- Patients who have contraindications for MRI should be not allowed to receive the implant.
Equipment for subcutaneous insertion of Sixmo:
The following equipment is needed for implant insertion under aseptic conditions:
- an examination table for the patient to lie on
- instrument stand covered with sterile drape
- adequate lighting, such as headlamp
- sterile fenestrated drape
- latex, talc-free sterile gloves
- alcohol pad
- surgical marker
- antiseptic solution, such as chlorhexidine
- local anaesthetic, such as 1% lidocaine with adrenaline 1:100,000
- 5 mL syringe with 25G×1.5" needle (0.5×38 mm)
- Adson single tooth tissue forceps
- #15 blade scalpel
- thin adhesive strip around 6 mm wide (butterfly strip)
- 100×100 mm sterile gauze
- adhesive bandages
- pressure bandage around 8 cm wide
- liquid adhesive
- 4 Sixmo implants
- 1 implant applicator
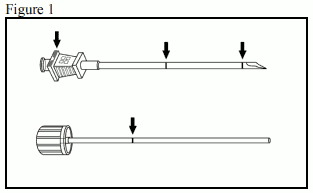
The implant applicator (disposable) and its parts are shown in Figure 1.
Instructions for subcutaneous insertion of Sixmo
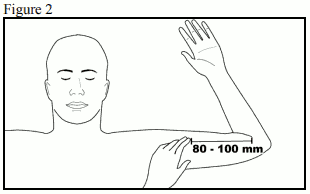
Step 1: The patient should lie on their back, with the intended arm flexed at the elbow and externally rotated, so that the hand is positioned next to the head. Identify the insertion site, which is at the inner side of the upper arm, about 80 to 100 mm (8 to 10 cm) above the medial epicondyle, in the sulcus between the biceps and triceps muscle. Having the patient flex the biceps muscle may facilitate identification of the site (Figure 2).
Step 2: Clean the insertion site with an alcohol pad. Mark the insertion site with the surgical marker.
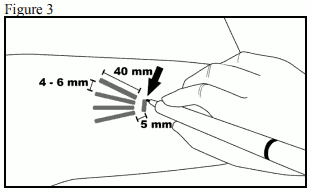
The implants will be inserted through a small 2.5 to 3 mm subcutaneous incision. Mark the channel tracks where each implant will be inserted by drawing 4 lines - with each line 40 mm long. The implants will be positioned in a close fan-shaped distribution 4 to 6 mm apart, with the fan opening towards the shoulder (Figure 3).
Step 3: Put on sterile gloves and check the function of the implant applicator by removing the obturator from the cannula and relocking it. Clean the insertion site with an antiseptic solution, such as chlorhexidine. Do not blot or wipe away.
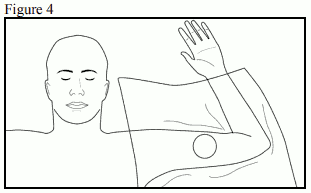
Apply the sterile fenestrated drape to the patient's arm (Figure 4). Anaesthetise the insertion area at the incision site and just under the skin, along the planned insertion channels, by injecting 5 mL lidocaine 1% with adrenaline 1:100,000. After determining that anaesthesia is adequate and effective, make a shallow incision 2.5 to 3 mm in length at incision site marking.
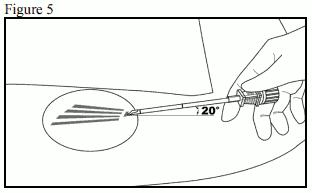
Step 4: Lift the edge of the incision opening with the toothed forceps. While applying counter-traction to the skin, at a slight angle (no greater than 20 degrees), insert only the tip of the applicator into the subcutaneous space (depth of 3 to 4 mm below the skin), with the bevel-up stop marking on the cannula facing upwards and visible with the obturator locked fully into the cannula (Figure 5).
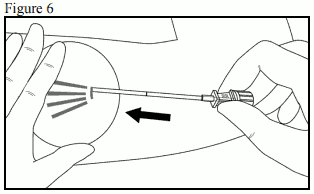
Step 5: Lower the applicator to a horizontal position; lift the skin up with the tip of the applicator, but keep the cannula in the subcutaneous connective tissue (Figure 6).
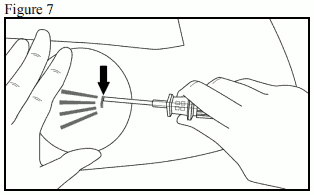
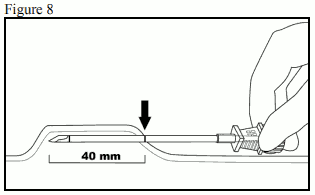
Step 6: While lifting, gently advance the applicator subcutaneously along the channel marking on the skin. Stop immediately once the proximal marking on the cannula has disappeared into the incision (Figures 7 and 8).
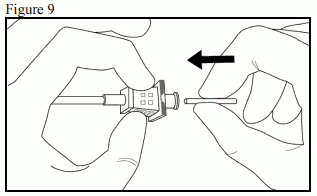
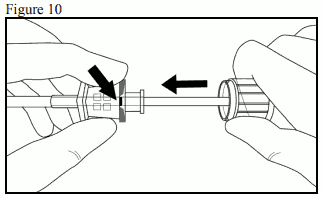
Step 7: While holding the cannula in place, unlock the obturator and remove the obturator. Insert one implant into the cannula (Figure 9), re-insert the obturator, and gently push the obturator forward (mild resistance should be felt) until the obturator stop line is level with the bevel-up stop marking, which indicates the implant is positioned at the tip of the cannula (Figure 10). Do not force the implant beyond the end of the cannula with the obturator. There should be at least 5 mm between the incision and the implant when the implant is properly positioned.
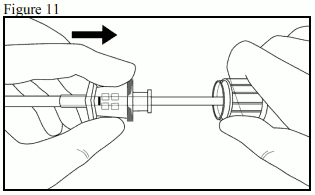
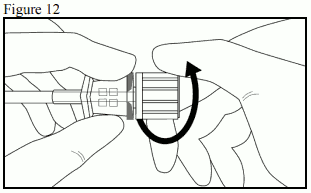
Step 8: While holding the obturator in place on the arm, retract the cannula along the obturator, leaving the implant in place (Figure 11). Note: Do not push the obturator. Withdraw the cannula until the hub is flush with the obturator, then twist the obturator clockwise to lock onto the cannula (Figure 12). Retract the applicator, bevel-up, until the distal marking of the cannula is visible at the incision opening (the sharp tip remaining in the subcutaneous space).
Step 9: Redirect the applicator to the next channel marking, while stabilizing the previously inserted implant with your index finger, away from the sharp tip (Figure 13). Follow steps 6 through 9 for the insertion of the three remaining implants through the same incision.

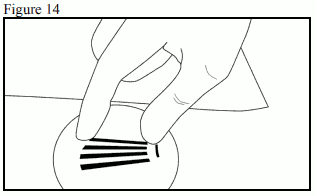
Step 10: Verify the presence of each implant (26.5 mm in length) by palpation of the patient's arm immediately after the insertion, as shown in Figure 14. If you cannot feel each of the four implants, or doubt their presence, use other methods to confirm the presence of the implant.
Step 11: Apply pressure to the incision site for approximately five minutes if necessary. Clean the incision site. Apply liquid adhesive to the skin margins and allow to dry before closing the incision with the thin adhesive strip around 6 mm wide (butterfly strip). Place a small adhesive bandage over the insertion site. Apply a pressure bandage with sterile gauze to minimize bruising. Instruct the patient that the pressure bandage can be removed after 24 hours and the adhesive bandage removed in three to five days, and to apply an ice pack on the arm for 40 minutes every two hours for the first 24 hours, then as needed.
Step 12: Complete the Patient Alert Card and give it to the patient to keep. Also, scan or input the details of the implant procedure into the patient's medical records. Advise the patient on proper care of the insertion site.
Instruction for location of implants prior to removal
Verify the location of the implants by palpation. Non-palpable implants must be located prior to attempted removal. In the case of non-palpable implants, removal should be performed under ultrasound guidance (following their localisation). Suitable methods for location include ultrasound with a high frequency linear array transducer (10 MHz or greater) or, in case ultrasound is not successful, magnetic resonance imaging (MRI). Sixmo implants are not radiopaque and cannot be seen by X-ray or CT scan. Exploratory surgery without knowledge of the exact location of all implants is strongly discouraged (see section 4.4).
Equipment for removal of Sixmo
Implants should be removed under aseptic conditions, whereby the following equipment is needed:
- an examination table for the patient to lie on
- instrument stand covered with sterile drape
- adequate lighting, such as headlamp
- sterile fenestrated drapes
- latex, talc-free, sterile gloves
- alcohol pad
- surgical marker
- antiseptic solution, such as chlorhexidine
- local anaesthetic, such as 1% lidocaine with adrenaline 1:100,000
- 5 mL syringe with 25G×1.5" needle (0.5×38 mm)
- Adson single tooth tissue forceps
- mosquito forceps
- two X-plant clamps (vasectomy fixation clamps with 2.5 mm ring diameter)
- iris scissors
- needle driver
- #15 blade scalpel
- sterile ruler
- 100×100 mm sterile gauze
- adhesive bandage
- pressure bandage around 8 cm wide
- sutures, such as 4-0 Prolene with an FS-2 cutting needle (may be absorbable)
Instructions for removal of Sixmo
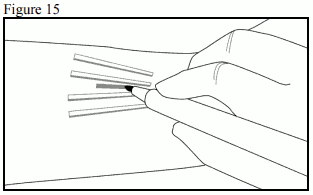
Step 13: The patient should lie on their back, with the implant arm flexed at the elbow and externally rotated, so that the hand is positioned next to the head. Reconfirm the location of the implants by palpation. Clean removal site with alcohol pad prior to marking the skin. Using the surgical marker, mark the location of the implants and the location of the incision. The incision should be made parallel to the axis of the arm, between the second and third implants, to access the subcutaneous space (Figure 15).
Step 14: Put on sterile gloves. Using aseptic technique, place the sterile equipment on the sterile field of the instrument stand. Clean the removal site with an antiseptic solution, such as chlorhexidine. Do not blot or wipe away. Apply the sterile drape to the patient's arm. Anaesthetise the incision site and the subcutaneous space containing the implants (for example, by injecting 5 to 7 mL lidocaine 1% with adrenaline 1:100,000).
NOTE: Be sure to inject the local anaesthetic deep to the centre of the implants; this will effectively lift the implants toward the skin, facilitating removal of the implants. After determining the anaesthesia is adequate and effective, make a 7 to 10 mm incision with a scalpel, parallel to the axis of the arm, between the second and third implants.
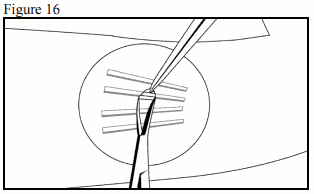
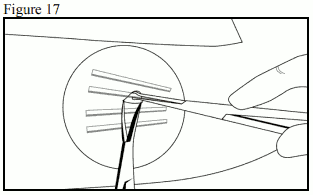
Step 15: Pick up the skin edge with Adson single toothed tissue forceps and separate the tissues above and below the visible implant, using an iris scissors or a curved mosquito forceps (Figure 16). Grasp the centre of the implant with the X-plant clamp(s) (Figure 17) and apply gentle traction. If the implant is encapsulated, or you see dimpling, use the scalpel to shave the adhering tissue to release the implant.
Step 16: After removal of each implant, confirm that the entire 26.5 mm long implant has been removed by measuring its length. Follow steps 15 and 16 for the removal of the remaining implants through the same incision. The same technique is employed for the removal of protruding or partially expelled implants. Exploratory surgery without knowledge of the exact location of all implants is strongly discouraged (see section 4.4).
Step 17: After removal of all implants, clean the incision site. Close the incision with sutures. Place an adhesive bandage over the incision. Use the sterile gauze and apply gentle pressure to the incision site, for five minutes, to ensure haemostasis. Apply a pressure bandage with sterile gauze to minimize bruising. Instruct the patient that the pressure bandage can be removed after 24 hours and the adhesive bandage in three to five days. Counsel the patient on proper aseptic wound care. Instruct the patient to apply an ice pack to the arm for 40 minutes every two hours for first 24 hours, then as needed. Schedule an appointment for the sutures to be removed.
Step 18: Disposal of Sixmo implants should be in accordance with local requirements as it contains buprenorphine.
If implant(s) or implant fragment(s) are not removed during a removal attempt, the patient should undergo imaging for localisation as soon as is feasible with the subsequent removal attempt performed on the same day as localisation. If localisation and a second removal attempt are not performed on the same day as the initial removal attempt, the wound should be closed with sutures in the interim.
4.9. Overdose
Symptoms
The manifestations of acute buprenorphine overdose include pinpoint pupils, sedation, hypotension, respiratory depression and death.
Treatment
Priorities are the re-establishment of a patient and protected airway and institution of assisted ventilation, if needed. Supportive measures (including oxygen, vasopressors) should be employed in the management of circulatory shock and pulmonary oedema as indicated. Cardiac arrest or arrhythmias will require advanced life support techniques.
The opioid antagonist naloxone is a specific antidote to respiratory depression resulting from opioid overdose. Naloxone may be of value for the management of buprenorphine overdose. Higher than normal doses and repeated administration may be necessary.
Healthcare professionals should consider the potential role and contribution of buprenorphine when given in conjunction with other CNS depressant medicinal products, CYP3A4 inhibitors, other opioids and in cases of hepatic impairment when determining whether the implants should be removed (see sections 4.4 and 4.5).
6.3. Shelf life
4 years.
6.4. Special precautions for storage
This medicinal product does not require any special storage conditions.
6.5. Nature and contents of container
Each Sixmo implant is packaged individually into a PET/LDPE/Alu/LDPE-peelable foil laminate sachet.
Implant kit: 4 Sixmo implants with 1 applicator.
6.6. Special precautions for disposal and other handling
The removed implant contains a significant amount of residual buprenorphine.
Any unused medicinal product or waste material should be disposed of in accordance with local requirements.
© All content on this website, including data entry, data processing, decision support tools, "RxReasoner" logo and graphics, is the intellectual property of RxReasoner and is protected by copyright laws. Unauthorized reproduction or distribution of any part of this content without explicit written permission from RxReasoner is strictly prohibited. Any third-party content used on this site is acknowledged and utilized under fair use principles.